This guide explains how to add a secondary or extra IP address to a Linux server's network interface using nmtui (NetworkManager Text User Interface). The process applies to CentOS 7, AlmaLinux 8/9, Rocky Linux 8/9, and RHEL 8/9. nmtui provides a simple text-based menu interface for configuring network settings without writing configuration files manually, making it suitable for both experienced administrators and those new to Linux networking.
Need a Linux VPS to test network configurations? Owned Networks KVM VPS plans support multiple IP addresses and provide full root access. See our KVM VPS plans in Seattle and other US and EU locations.
What is nmtui?
nmtui (NetworkManager Text User Interface) is a terminal-based graphical frontend for NetworkManager. It allows you to add, edit, and remove network connections and IP addresses on a Linux server without using the command line directly. It is available on all major RHEL-compatible distributions and is the recommended method for managing network interfaces when a graphical desktop is not available.
Before You Start
- You must have root or sudo access on the server
- Know the network interface name you want to configure — confirm it with
ip addrornmcli device statusbefore starting - Know the secondary IP address and subnet mask you want to add
- On production servers, applying network changes can briefly interrupt connectivity — plan accordingly or use an out-of-band console if available
- nmtui requires NetworkManager to be running — confirm with
systemctl status NetworkManager
Step 1: Install nmtui
nmtui is part of the NetworkManager-tui package. On most fresh server installations it is already present. If not, install it using the appropriate package manager for your distribution.
CentOS 7
sudo yum install NetworkManager-tui -y |
AlmaLinux 8/9, Rocky Linux 8/9, RHEL 8/9
sudo dnf install NetworkManager-tui -y |
Step 2: Start and Enable NetworkManager
If NetworkManager is not already running, start it and enable it to start on boot. This applies to all supported distributions.
sudo systemctl start NetworkManager sudo systemctl enable NetworkManager |
Confirm NetworkManager is active before continuing:
systemctl status NetworkManager |
Step 3: Identify Your Network Interface
Before opening nmtui, confirm the name of the network interface you want to configure. Interface names vary by system — common names on KVM VPS instances include eth0, ens3, and ens18. On bare metal servers with physical NICs, names like enp3s0 or em1 are common.
ip addr |
Or using NetworkManager directly:
nmcli device status |
Note the interface name before proceeding — you will need it when applying changes after nmtui.
Step 4: Open nmtui
Launch the nmtui interface by running:
sudo nmtui |
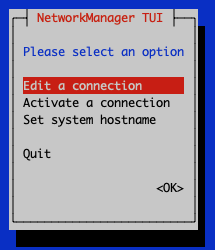
The main menu appears:
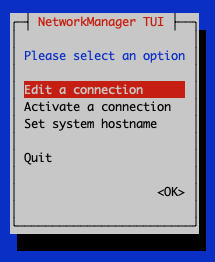
Use the arrow keys to navigate. Select Edit a connection and press Enter.
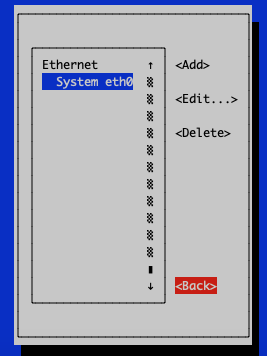
Step 5: Select the Connection to Edit
A list of available network connections appears:
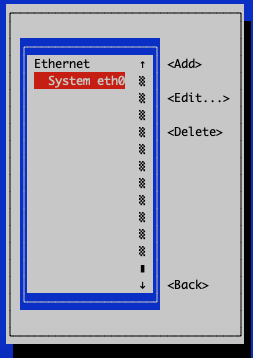
Use the arrow keys to highlight the connection tied to the interface you want to configure, then tab to <Edit...> and press Enter:
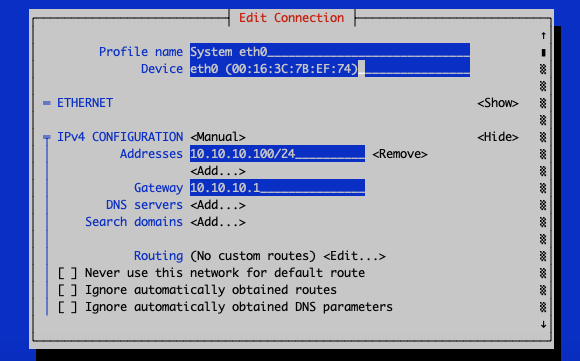
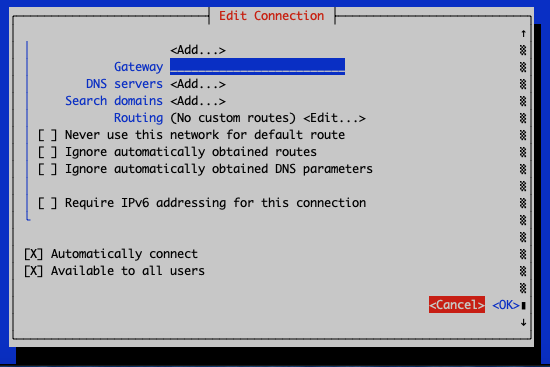
Step 6: Add the Secondary IP Address
In the connection editor, scroll down to the IPv4 CONFIGURATION section. Under Addresses, navigate to <Add...> and press Enter.
Enter the secondary IP address in CIDR notation — for example 10.10.10.18/24. The subnet mask must be included. If your provider assigns a specific subnet, use that — do not default to /24 without confirming.
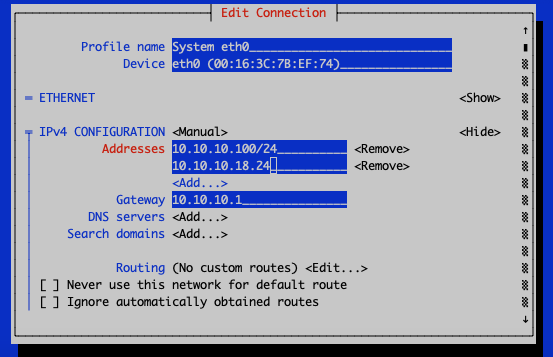
After entering the IP address, scroll all the way down to <OK> and press Enter to save the connection:
Step 7: Exit nmtui
After saving, navigate back to the main menu and select Quit:
Step 8: Apply the Network Changes
Saving in nmtui writes the configuration but does not activate it. You must reload the connection to bring the new IP address online. The correct command depends on your distribution.
AlmaLinux 8/9, Rocky Linux 8/9, RHEL 8/9 (recommended method for all distros)
Replace eth0 with your actual interface or connection name:
nmcli connection reload nmcli connection up eth0 |
CentOS 7 (legacy method)
systemctl restart network |
Note: The systemctl restart network command does not exist on RHEL 8/9, AlmaLinux 8/9, or Rocky Linux 8/9 — the network service was removed. Use the nmcli method above on all modern distributions. It also works on CentOS 7 and is the preferred approach going forward.
Step 9: Verify the Secondary IP is Active
Confirm the new IP address is assigned to the interface:
ip addr show eth0 |
The secondary IP should appear in the output alongside the primary address. Both addresses will remain active until the interface is brought down or the configuration is removed.
To test reachability from the server itself:
ping -c 4 10.10.10.18 |
Command-Line Alternative: nmcli
If you prefer not to use the interactive interface, you can add a secondary IP directly from the command line using nmcli. This is faster for scripting or when managing many servers. Replace eth0, the IP, and the prefix with your actual values:
nmcli connection modify eth0 +ipv4.addresses "10.10.10.18/24" nmcli connection reload nmcli connection up eth0 |
This method produces the same persistent result as using nmtui and works identically on CentOS 7, AlmaLinux, Rocky Linux, and RHEL 8/9.
Related Solution
Need a Linux VPS with multiple IP addresses?Owned Networks KVM VPS plans support additional IP addresses on request. All plans include full root access and support for CentOS 7, AlmaLinux, Rocky Linux, Debian, and Ubuntu. Deploy in minutes and manage your network configuration directly.
|
Frequently Asked Questions
Does nmtui work on AlmaLinux and Rocky Linux?
Yes. nmtui is part of the NetworkManager-tui package and works identically on CentOS 7, AlmaLinux 8/9, Rocky Linux 8/9, and RHEL 8/9. The interface and workflow are the same across all versions. The only difference is the command used to apply changes after saving — use nmcli connection reload and nmcli connection up on EL8/EL9 instead of systemctl restart network.
Why doesn't "systemctl restart network" work on AlmaLinux or Rocky Linux?
The legacy network service was removed in RHEL 8 and all compatible distributions. Network management is handled exclusively by NetworkManager on EL8 and EL9. Use nmcli connection reload followed by nmcli connection up <interface> to apply configuration changes on these systems.
Will the secondary IP persist after a reboot?
Yes. Changes saved through nmtui are written to the NetworkManager connection configuration file in /etc/NetworkManager/system-connections/. The IP will be automatically applied every time the interface comes up, including after a reboot.
What CIDR notation should I use for the subnet mask?
Use the prefix length that matches your network. Common values are /24 (equivalent to 255.255.255.0) for most private subnets, /32 for a single host address with no local subnet routing, and /29 or /30 for small provider-assigned blocks. If your VPS provider assigns secondary IPs, check the subnet they specify — using the wrong prefix can affect routing.
Can I add multiple secondary IPs using nmtui?
Yes. In the IPv4 CONFIGURATION section of the connection editor, you can add as many addresses as needed by selecting <Add...> multiple times. Each address is entered separately and all are saved when you confirm with <OK>.
How do I remove a secondary IP address using nmtui?
Open nmtui, select the connection, navigate to the secondary IP address entry under IPv4 CONFIGURATION, and use the <Remove> option next to it. Save and apply with nmcli connection reload && nmcli connection up <interface>.

