This guide walks through how to create, format, mount, and persistently configure an Ext4 partition in Linux using fdisk and mkfs.ext4. This process applies to any additional disk added to a Linux server, whether a physical drive, a virtual disk on a KVM VPS, or a new volume on a dedicated server. All steps are performed from the command line with root or sudo access.
Working with a new disk on a VPS? Owned Networks KVM VPS plans include additional disk volumes available on request. See our KVM VPS plans in Dallas and other US and EU locations.
What is the Ext4 File System?
Ext4 (fourth extended filesystem) is the default journaling file system for most Linux distributions. It was developed as the successor to ext3 and remains the most widely used Linux file system for general-purpose server workloads. Key features include:
- Journaling: Tracks changes before writing to disk, reducing the risk of data corruption after a crash or power failure
- Large file system support: Supports volumes up to 1 exabyte and individual files up to 16 terabytes
- Extents: Stores large files more efficiently than ext3, reducing fragmentation
- Persistent pre-allocation: Reserves disk space for a file without writing data, useful for databases and media applications
- Delayed allocation: Improves write performance by grouping allocations before committing to disk
- Backward compatibility: Ext3 and ext2 file systems can be mounted as ext4
- Journal checksums: Improves reliability of the journal in case of corruption
Before You Start
- You must have root or sudo access on the server
- The new disk must already be attached to the server — confirm it is visible to the OS before proceeding
- Identify the correct device name carefully — running
fdiskon the wrong disk will destroy data - If the disk you are partitioning is larger than 2 TB, use
partedwith a GPT partition table instead offdiskwith MBR — see the note at the end of this guide - If this is a production server, take a snapshot or backup before making any disk changes
Step 1: Identify the New Disk
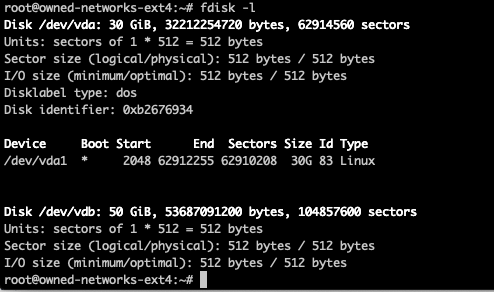
Before doing anything, list all disks and partitions to confirm which device corresponds to the new disk. Use either fdisk -l or lsblk.
Option A: fdisk
sudo fdisk -l |
Option B: lsblk (cleaner output, easier to read)
lsblk |
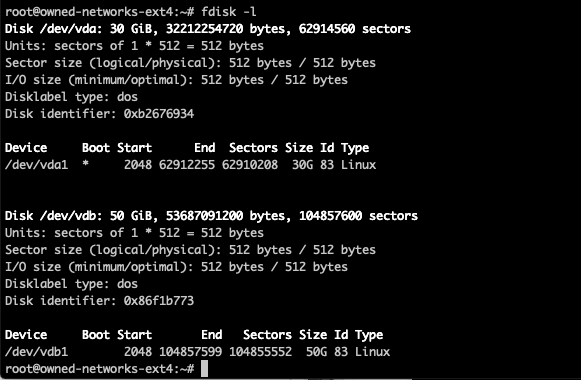
In this example, the server has two disks: the primary 30 GB system disk at /dev/vda and the new 50 GB disk at /dev/vdb. On KVM VPS instances, virtual disks typically appear as /dev/vda, /dev/vdb, and so on. On bare metal servers with SATA or SAS drives, they typically appear as /dev/sda, /dev/sdb, etc.
Important: Confirm the device name of your new disk before proceeding. Running fdisk on the wrong device will overwrite its partition table.
Step 2: Create a New Partition
Run fdisk on the new disk — in this example /dev/vdb. Replace this with your actual device name.
sudo fdisk /dev/vdb |
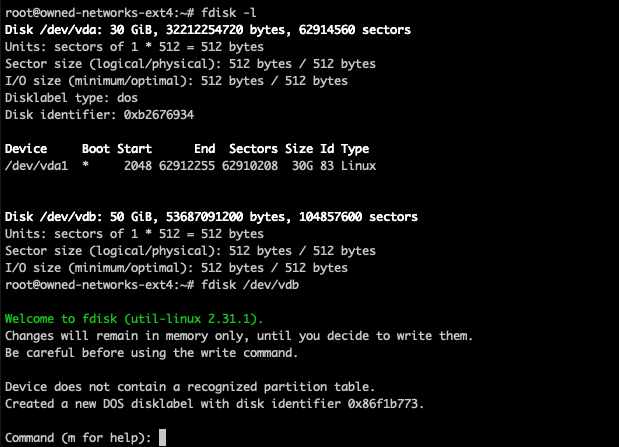
Inside the fdisk interactive prompt, use the following keystrokes:
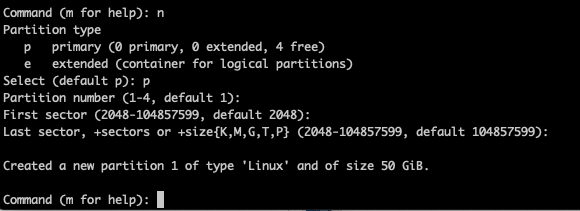
- Press m to view all available commands
- Press n to create a new partition
- Press Enter to accept the default partition type (primary)
- Press Enter to accept the default partition number (1)
- Press Enter twice to accept the default first and last sectors — this uses the entire disk
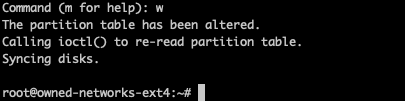
Once the partition is configured, write the changes to disk by pressing w. This commits the partition table and exits fdisk.
Step 3: Verify the New Partition
Confirm the partition was created successfully by running fdisk -l again:
sudo fdisk -l |
The new partition should appear at the end of the list — in this example as /dev/vdb1. The number suffix indicates the partition number. If you created multiple partitions they would appear as /dev/vdb1, /dev/vdb2, and so on.
Step 4: Format the Partition as Ext4
The partition exists but has no file system yet. Format it as ext4 using mkfs.ext4:
sudo mkfs.ext4 /dev/vdb1 |
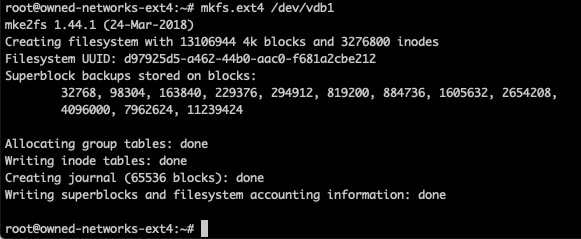
The command will write the ext4 superblock, allocate inode tables, and create the journal. This takes a few seconds on most VPS volumes and longer on large physical drives. Once it completes the partition is ready to mount.
Optional — Add a label: You can assign a human-readable label to the partition at format time, which makes it easier to identify later:
sudo mkfs.ext4 -L mydatalabel /dev/vdb1 |
Step 5: Create a Mount Point and Mount the Partition
Create the directory where the partition will be mounted. Choose a path that reflects its purpose:
sudo mkdir -p /mnt/mynewmount |
Mount the partition:
sudo mount /dev/vdb1 /mnt/mynewmount |
Verify the mount was successful using df with human-readable and type flags:
df -hT |
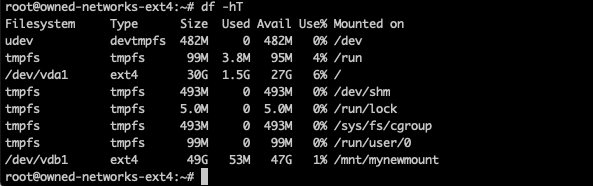
The partition should appear in the output with type ext4 and its mount point. Any data written to /mnt/mynewmount will be stored on the new disk.
Step 6: Make the Mount Persistent Across Reboots
The current mount will be lost after a reboot. To make it permanent you need to add an entry to /etc/fstab. The correct way to do this is using the partition's UUID rather than its device name (/dev/vdb1). Device names can change across reboots depending on the order disks are detected — UUIDs never change.
Get the UUID of the new partition:
sudo blkid /dev/vdb1 |
The output will look similar to this:
/dev/vdb1: UUID="a1b2c3d4-e5f6-7890-abcd-ef1234567890" TYPE="ext4" PARTUUID="..." |
Copy the UUID value. Open /etc/fstab with a text editor:
sudo nano /etc/fstab |
Add the following line at the end of the file, replacing the UUID with your actual value:
UUID=a1b2c3d4-e5f6-7890-abcd-ef1234567890 /mnt/mynewmount ext4 defaults 0 2 |
The fields in order are: device (UUID), mount point, file system type, mount options, dump flag, and fsck pass order. The value 0 2 tells the system not to dump this partition and to run a file system check on it after the root partition (0 1) during boot.
Critical: Before rebooting, test the fstab entry to make sure it is correct. A broken fstab can prevent the server from booting:
sudo mount -a |
If this command returns no errors, the fstab entry is valid. If it returns an error, fix the entry before proceeding.
Note: Disks Larger Than 2 TB — Use parted with GPT
The fdisk tool uses MBR (Master Boot Record) partition tables by default, which supports a maximum disk size of 2 TB. For disks larger than 2 TB, use parted with a GPT (GUID Partition Table) instead:
sudo parted /dev/vdb (parted) mklabel gpt (parted) mkpart primary ext4 0% 100% (parted) quit |
After creating the partition with parted, format it with mkfs.ext4 and follow Steps 4 through 6 above exactly as written.
Related Solution
Need additional disk space on your Linux server?Owned Networks KVM VPS plans provide fast NVMe-backed virtual disks on KVM hypervisors with full root access. If you need a fresh server to test disk configurations or additional storage for a production workload, deploy in minutes.
|
Frequently Asked Questions
What is the difference between fdisk and parted?
fdisk is an interactive tool that works with MBR partition tables and supports disks up to 2 TB. parted supports both MBR and GPT partition tables and handles disks larger than 2 TB. For most VPS workloads where disk volumes are under 2 TB, fdisk is sufficient. For dedicated servers with large storage arrays, use parted with GPT.
Why should I use UUID in fstab instead of the device name?
Device names like /dev/vdb1 are assigned by the kernel at boot time based on detection order. If you add, remove, or reorder disks, a device name can change and the fstab entry will fail to mount — or worse, mount the wrong device. UUIDs are assigned at format time and are permanently tied to the partition regardless of where it is physically connected.
What does the last field in the fstab entry mean?
The sixth field in an fstab entry controls the file system check (fsck) order at boot. A value of 0 disables fsck for that partition. A value of 1 is reserved for the root partition. A value of 2 means the partition will be checked after the root partition. For non-root ext4 data partitions, use 2.
How do I check if the partition mounted correctly after a reboot?
Run df -hT after the server comes back online. The partition should appear with its mount point and file system type listed as ext4. You can also run lsblk to see the full disk and partition tree.
Can I extend an ext4 partition later if I need more space?
Yes. You can resize an ext4 partition online (while mounted) using resize2fs after first expanding the underlying block device or partition. The exact process depends on whether you are resizing a physical partition, a logical volume (LVM), or a cloud disk volume. Always back up data before resizing a partition.
What mount options should I use in fstab for a data partition?
The defaults option is appropriate for most general-purpose data partitions. It enables read-write access, automatic mounting at boot, and standard device and execution permissions. For partitions holding untrusted data or temporary files, consider adding noexec and nosuid to prevent execution of binaries from that volume.

